
Create a Conversions Tab in Excel
Below, you see my tab called Conversion. Each of the groups in this tab are similar except the Temperature group because the conversion of temperature from Fahrenheit to Celcius involves a formula (the conversion is linear) vs. scalar for other conversions.
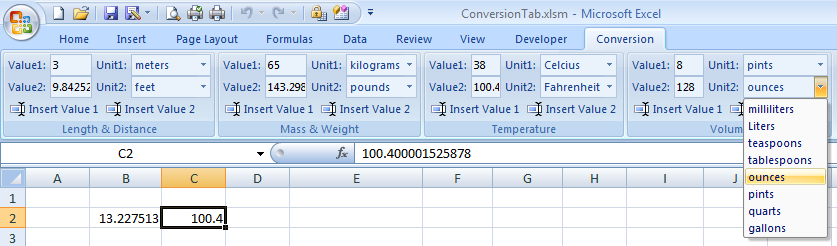
We must understand how this works in order to write the code for it. Let's take Length & Distance group as an example.
- We enter a value in Value1 editBox. Unit1 and Unit2 dropDowns are filled in automatically at load so upon entering a value in Value1, it is automatically converted based on Unit2 and displayed in Value2. In the initial case it's the same value since the Unit1 and Unit2 are the same on load.
- Changing Unit1 to another unit automatically converts Value1 to the appropriate value based on Value2 and Unit2.
- Changing Value2 automatically updates Value1 to the appropriate value based on Unit1.
- Changing either Value1 or Value2 automatically updates Value2 or Value1, respectively.
- Changing units in Unit1 or Unit2 automatically changes Value1 or Value2, respectively.
Outlining Our Approach
Now that we know what we want to accomplish, we need to know all the units that we will be playing with. The units you want to include depend on you. The units I included are: millimeters, centimeters, meters, kilometers, inches, feet, yards, and miles. The question is how to convert from one unit to another. There are two approaches. First is to calculate a factor for the mutual conversions as shown in the Excel array here:
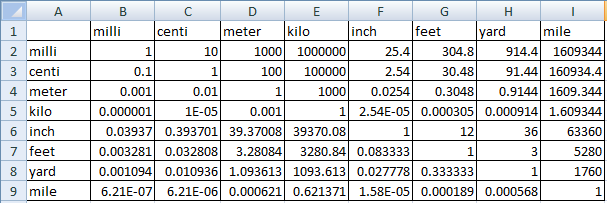
As you can see, you need a factor for any two units. Hence, for 8 units, you will have a total of 64 factors. Moreover, you would have to have your code account for all 64 cases of conversion! That's too many cases to deal with.
I'm not in favor of this method. Hence, I used a clever trick - the use of an intermediary conversion. First, we convert the value to a base value, which can be any unit we choose. I chose the millimeter as the intermediary conversion. Take a look at the following array. This table shows the number of millimeters for the various units we have selected. So, according to the table, there are 25.4 millimeters in 1 inch and 914.4 millimeters in 1 yard.

The approach is to convert any value entered in Value1 editBox to millimeters. Hence, if you enter 25 in Value1 editBox and feet is selected in Unit1 dropDown, then an intermediary variable should hold the value 25 × 304.8 = 7260 (of course this is in millimeters). Then, to convert the value to a different unit, we divide by the factor for that unit. Hence, if meters is selected in Unit2 dropDown, then the conversion is 7260 / 1000 = 7.26. This is equal to (intermediary variable) / (factor for meter). Hence, all we have to do is define these factors as variables beforehand. And we have only 8 factors; one for each unit!!
Building the XML Code
Now that we know how to tackle this problem, we start with building our XML code so that the controls are where they need to be.
<group id="Lengths" label="Length and Distance">
  <box id="box1" boxStyle="horizontal">
  <editBox id="Length1" label="Value1:" screentip="Enter initial value to convert"  onChange="LengthValueChange" getText="LengthGetText" sizeString="111111" />
   <dropDown id="Length1Unit" label="Unit1:" getItemCount="Length1ItemCount" getItemLabel="Length1ListItem" onAction="Length1OnAction" getSelectedItemIndex="Length1ItemSelectedIndex" sizeString="centimeters" />
  </box>
  <box id="box2" boxStyle="horizontal">
  <editBox id="Length2" label="Value2:" screentip="Value after conversion" onChange="LengthValueChange" getText="LengthGetText" sizeString="111111" />
  <dropDown id="Length2Unit" label="Unit2:" getItemCount="Length2ItemCount" getItemLabel="Length2ListItem" onAction="Length2OnAction" getSelectedItemIndex="Length2ItemSelectedIndex" sizeString="centimeters" />
  </box>
  <box id="box3" boxStyle="horizontal">
  <button id="Length1InsertValue" imageMso="DatasheetColumnRename" label="Insert Value 1" onAction="LengthInsertAction" screentip="Insert Value 1 to current cell" />
  <button id="Length2InsertValue" imageMso="DatasheetColumnRename" label="Insert Value 2" onAction="LengthInsertAction" screentip="Insert Value 2 to current cell" />
  </box>
  </group>
The XML code for editBoxes are straight-forward if you've reviewed the editBox prior to this section. I only introduced one property: sizeString="111111" This determines the size of the editBox. It will be able to display up to 6 characters. The editBox control has the following callbacks:
- getText="LengthGetText": This fetches the initial values to display in the editBox. Upon starting Excel, the values to display have not been defined, so Excel displays 0. However, for our case, we will actually invalidate the ribbon each time a value changes. This invalidation refreshes the ribbon; hence, displaying the currently converted value in the editBox. This will be explained later.
- onChange="LengthValueChange": This callback is important because it changes the value in the editBox and also calculates the value to display in the other editBox after conversion. Then, it invalidates the ribbon and upon refreshing, the converted value is displayed in the editBox.
The dropDown control has the following callbacks:
- getItemCount="Length1ItemCount": For a dropDown, we need to let the Ribbon know how many items to display in the dropDown. This value can change programatically; however, for our purposes, it will be 8. I have given this callback unique names as there are two dropDowns for units. This is to keep track of each one as each item in the dropDown is called by an index number, not its display text.
- getItemLabel="Length1ListItem": This callback lists the items in our dropDown. This callback is executed repeatedly until all index items are accounted. Hence, this will repeat 8 times with the index number increasing by 1 (starting from 0) each time.
- onAction="Length1OnAction": This callback also does some calculations because when the unit changes, we need to perform a calculation to display a new value in Value1 editBox.
- getSelectedItemIndex="Length1ItemSelectedIndex": This callback gets and stores the index number of the selected item. This value is held in a variable (we will use Value1Index and Value2Index variables) and will be used to restore the selected item after invalidation.
Adding Functionality to Controls
Now, we add the functionality to the controls. If you're not already confused, this may be the most confusing part. However, let's take one step at a time.
Step 1: Declare Factors and Item Labels
Our first step is to get all the factors declared. The best way to do this is to use an array so that we can call the factor with a number (since our dropDown items are called by index numbers). We can use a 2 × 8 array and get the item labels declared at the same time. We'll create a subroutine for this that can be called at load time:
Public Length(2, 8) As String
Sub GetLength()
    Length(1, 0) = "millimeters"
    Length(2, 0) = 1
    Length(1, 1) = "centimeters"
    Length(2, 1) = 10
    Length(1, 2) = "meters"
    Length(2, 2) = 1000
    Length(1, 3) = "kilometers"
    Length(2, 3) = 1000000
    Length(1, 4) = "inches"
    Length(2, 4) = 25.4
    Length(1, 5) = "feet"
    Length(2, 5) = 304.8
    Length(1, 6) = "yards"
    Length(2, 6) = 914.4
    Length(1, 7) = "miles"
    Length(2, 7) = 1609344
End Sub
Notice that it starts with 0 since our dropDown items start with an index of 0. Now, We need to load this list when the application launches. There are two things we need. First, in our XML code, we need to define an onLoad callback.
<customUI onLoad="ribbonLoaded" xmlns="http://schemas.microsoft.com/office/2006/01/customui">
The callback onLoad="ribbonLoaded" will run the ribbonLoaded subroutine on application launch. Our ribbonLoaded subroutine is:
Sub ribbonLoaded(ribbon As IRibbonUI)
    Set rib = ribbon
    Call GetLength
    Call Mass.GetMass
    Call Temp.GetTemp
    Call Volume.GetVolume
End Sub
Note: Make sure Set rib = ribbon is included in the ribbonLoaded subroutine. If it is not, then the ribbon will not invalidate and refresh.
Note: My GetLength subroutine is in a module called Length, which also contains all the subroutines described. Hence, I do not have to use Length.GetLength. But for my other subroutines stored in their respective modules, I have to specify their locations with Module.Sub.
I have all of my factors in separate subroutines. The one that applies here is Call GetLength. Now, let's get the item names in the dropDown. The callbacks that assign item names or item labels are getItemCount="Length1ItemCount" and getItemLabel="Length1ListItem". These work together; the first sets the number of items and the other gets labels for each. Here are the subroutines:
Sub Length1ItemCount(control As IRibbonControl, ByRef returnedVal)
    ItemCount = UBound(Length, 2)
    returnedVal = ItemCount
End Sub
'Called once for each item in drop down.
'If Length1ItemCount tells Excel there are 8 items in the drop down
'Excel calls this sub 8 times with an increased "index" argument each time.
'We use "index" to know which item to return to Excel.
Sub Length1ListItem(control As IRibbonControl, index As Integer, ByRef returnedVal)
    returnedVal = Length(1, index) 'index is 0-based
End Sub
UBound(Length, 2) gets the item count from the Length array. Then, for each index from 0 to 7, returnedVal = Length(1, index) will fetch the text label from the first dimension of the Length variable.
Step 2: Add Functionality to editBoxes
Now, let's work on adding functionality to the two editBoxes. Since our callback is not specific, we can use the Select Case statement. The callback is onChange="LengthValueChange".
Sub LengthValueChange(control As IRibbonControl, text As String)
    If text = "" Then Exit Sub
    Dim fact1 As Single
    Dim fact2 As Single
    Select Case control.ID
        Case "Length1"
            fact1 = Length(2, Value1Index)
            Length1 = text
            intermed = fact1 * Length1
            fact2 = Length(2, Value2Index)
            Length2 = intermed / fact2
            Call RedoRib
        Case "Length2"
            fact2 = Length(2, Value2Index)
            Length2 = text
            intermed = fact2 * Length2
            fact1 = Length(2, Value1Index)
            Length1 = intermed / fact1
            Call RedoRib
    End Select
End Sub
This deserves some line-by-line explanation:
- Line 2: The VB code tends to error out when you leave the editBox blank. Hence, this line will simply exit the subroutine instead of displaying an error box and prevent the Ribbon controls form malfunctioning.
- Line 3 & 4: These lines declare the variables that will hold the factors for our units. They are single because the numbers could be decimals.
- Line 7: This line fetches the factor based on the current index of the first dropDown. Remember this is the factor that converts the value to millimeters after multiplication.
- Line 8: This line assigns Length1 the string in text. I had declared Length1 as single. It may seem we can skip this step and simply let Line 9 be intermed = fact1 * text. However, we need to capture the value of Value1 editBox because when the Ribbon is invalidated, the LengthGetText subroutine will fetch the value again stored in Length1 variable.
- Line 9: This converts the value entered in editBox 1 to the intermediary converion (which is millimeters) after the multiplication.
- Line 10 & 11: This line fetches the factor that will convert back to the unit specified in dropDown 2. In the next line, the division converts the value.
- Line 12: Call RedoRib is the subroutine that refreshes the ribbon.
Here is the Call RedoRib subroutine.
Sub RedoRib()
    rib.Invalidate
End Sub
Now, we need the subroutine that will get the new values to display:
Sub LengthGetText(control As IRibbonControl, ByRef text)
    Select Case control.ID
        Case "Length1"
            text = Length1
        Case "Length2"
            text = Length2
    End Select
End Sub
This completes the subroutines for both the editBoxes. We are slowly piecing together the code. We now only have two callbacks for the two dropDowns to go.
 Note: I have mentioned variables as I came across them. However, in your module, the public variables will be declared prior to all the subs as depicted in the image. You will have to declare the variable for all of your modules.
Step 3: The Last Piece
We already have 2 callbacks written for the dropDowns: one for number of items and one for getting their labels. Now, we need two more callbacks: one for getting the index number of newly selected item and doing something with that (onAction) and one for saving the index number so that when the ribbon is invalidated, it can be returned to its original state (getSelectedItemIndex). When you select a different item, the index number changes to that item's index number and is passed as the variable index. We save this variable as Value1Index for restoring the ribbon after invalidation. Here is the final code for the last two callbacks.
'Drop down change handler. Called when a drop down item is selected. Sub Length1OnAction(control As IRibbonControl, ID As String, index As Integer) 'All we do is note the index number of the item selected. 'We use this in sub Length1ItemSelectedIndex below to reselect the current 'item, if possible, after an invalidate. Value1Index = index Dim fact1 As Single Dim fact2 As Single fact1 = Length(2, Value1Index) fact2 = Length(2, Value2Index) intermed = fact2 * Length2 Length1 = intermed / fact1 Call RedoRib End Sub
Sub Length1ItemSelectedIndex(control As IRibbonControl, ByRef returnedVal) returnedVal = Value1Index End Sub
The difference between the onAction callbacks for the 2 editBoxes and the 2 dropDowns is that, with editBoxes, the other editBox is updated and with dropDowns, the corresponding editBox is updated. To be clear, if you enter a value in Value1, then Value2 is updated. When you change Unit1, then Value1 is updated. With the available code, you should be able to follow the logic.
Don't forget to write the code for Length2ItemCount, Length2ListItem, Length2OnAction, and Length1ItemSelectedIndex. The code for these is similar to their "1" counterpart.
With this, I conclude the Conversion tab with examples of editBoxes and dropDowns. In my tab, the groups Mass & Weight and Volume both use the same setup. The only difference being the factors and labels. The group Temperature is a bit challenging and is left for the user to explore. I used Fahrenheit, Celcius, and kelvins for my conversion. Let me know if you succeed!